Building my own guitar seemed to be the stuff of a dream and I had toyed with building a kit or renovating an old guitar. But after a good friend of mine bought a cigar box guitar kit online I decided to have a go at making my own. My friend very kindly got my a cheap jewellery box from a hardware store. In fact he bought two the same and we would both build a guitar using the same type of box. I was determined to cram a resonator into mine, but was unsure how to go about doing so, I came up with this.

Yes, that's a cat bowl :o) the kind of cheap $1 stainless pet bowl you can buy at any store. It comes with a non-slip rubber surround which I just threw away. Then turned it over and polished it with wire wool and some metal rubbing compound.


Okay, I made hard work of this. Using a craft knife to cut compressed cardboard was never going to be a good idea and I spent half the time fixing myself with super glue and plasters.

Not a bad fit, if I say so myself :-)

The neck was to be a through-body design with room for the resonator. This meant sketching out a few ideas and a visit to a local hardware store got me two pieces of hemlock for next to nothing. Hemlock is dirt cheap and usually used for fence posts so you can't get more authentic than that. It is also really quite strong and light weight. However it splintered like a b@stard and I wouldn't recommend it's use for a project like this.


Doing it the hard way, with possibly the bluntest saw in the world! I thank my father for the loan of his garage and tools but really this saw had already seen the best of its days.

Here I'm gluing the second piece of the neck. It's cut from the second length of hemlock and arranged so that the bow of the grain pulls against the rest of the neck. After gluing it'll be very strong and shouldn't bend.

Yes, that's right. I am using steel nails for frets. This is a test fitting to see how it'll look.

I have no depth gauge so I'm using a match stick to get the slots the correct depth and shape.

I needed to make sure the shellac wasn't going to make the ink bleed and spoil the print when I come up with a design for the box. The result was quite good and should work fine.

My mind wandered into what could I use for a guitar knob? My first plan was to use a volume pot as a kind of blend control between a magnetic pickup and the piezo. I had seen shotgun shells used as knobs and ordered a load of spent shells online and as I would be at work had them delivered to my parents house. Had an interesting conversation with my father later in the day as apparently the packaged was wet through from the rain and burst open when pushed through the letterbox! scattering spent shells all over the hallway. Oops!

Making the knob is pretty easy. I found a bolt slightly smaller than the shaft of the pot. That way the hot glue should grip it petty well. Fill the cut down shell with hot glue and push in the rod. When the glue is set simply unscrew the bolt and push in place.


For the saddle of the resonator I needed a biscuit for the bone to sit in. I found a craft supplier that sold small wooden discs and bought a few. Cut a slot with a small saw and finished with a hobby file.


A few drops of Loctite's finest to keep it in place.

I have no power tools and to keep the build as simple as I could most of the build would be done by hand. Here I have started shaping the headstock with a small drop for the tuners. Hemlock is hard work as it splinters very easily and is soft. However it does shape very quickly and can be filed smooth very cleanly.


The timber came with slightly rounder corners so I had to file back to the glue-line before shaping. I've taken in the heel to give some shape to it, otherwise it'll just be a large square block.

I have no tool for cutting straight lines so had to eyeball it by carefully dragging the saw along the line until it cut deep enough to file back for the nails to sit in.

Every single slot was cut and filed by hand until the nails sat perfectly in each slot. They are going to be glued in place so a snug fit is required.

No power tools here, just cheap hand tools from B&Q :-) this is a surform plane and is about as cheap as it gets. It quickly planes and shapes any surface and I can recommend a cheap tool like this if your budget is as tight as mine.


For fret markers I'm using brass rod. I haven't done anything like this since I made furniture so it's quite an experiment.

Again using a matchstick as a depth gauge, very cheap and readily available. I cut a small piece of brass rod to length. They'll be tapped home into a hole the same size and fit without needing any glue.

You'll need a decent length so that you can round one of the ends into a bullet shape. This will help it guide home into the hole you've drilled without splitting the wood. It'll fit snug without any gaps and no glue needed.

Each dot is filed flush with the fretboard using a hobby file after taping off around it.

The result is this, a brass fret marker that fits flush and seamlessly without glue. As inlays go it's about as simple as it gets, but that's the whole vibe of this project.

I bought these drill bits from Maplin. They are stepped and are great for making holes. Here I have cut out a hole for one of the sound holes and am making a start on the slot for the lipstick pickup.

A test fitting of a brass hinge for a tailpiece. The long bolt with a nut is working well, but I changed this idea for a mandolin tailpiece later in the build as I just didn't like how this brass hinge looked.

A test fitting of the neck with the heel shaped. You can see the gluelike has almost disappeared into the grain and it looks like a single piece of wood. There is no separate fretboard so it has to be deep enough to raise the fretboard well above the body to keep the action low enough. I have drilled four holes throw outer holes are for the sound holes. The two inner holes will be joined together to make a long hole for the lipstick pickup

A test fitting of the sound holes and lipstick pickup. The sound holes are for leather work and will be a push fit without need for glue while small holes will have to be drilled for the pickup screws.


A test fitting of a fret before committing to the idea. I still need to decide wether to fit frets before or after finishing the neck with shellac. Either way I will have to work around whatever happens.


More test fittings. I cannot emphasise enough test fitting everything you do as you go. Here I am checking the action with a long piece of cotton. Also checking the break angle of the bridge. I can also check the alignment of the neck and make sure it is straight and true.

World record for the number of clamps in a box! :D in making a large hole for the cat bowl to sit in the rigidity of the box was compromised. I thought a lot about how to brace the box and settled upon a simple H style bracing to reinforce the box.


The built up portions of the bracing give a resonating chamber but still let the sound travel to the sound holes near the lipstick pickup.
I went with cabinet spring locks. They use ball bearings and should lock smoothly with a definitely click. Some people don't have their box open, but I'm installing a boost circuit to give an active pickup setup and will need access to the 9volt battery from time to time. Plus it's cool to be able to show people inside the box when they ask.


I found some Robert Johnson artwork online and printed it out in paper. It's glued to the outside of the box after covering the whole box with plain paper.

This artwork was unamed and is a pastel study of a well known Robert Johnson photograph I printed this out and glued to the back of the box.
The spine of the book/box is also from the poster and glued in place.

Here I have applied some shellac to the fretboard of the neck just to see how it'll look. The fret markers on the side of the neck are brass tacks cut down and filed smooth.

I applied shellac to the box artwork use a "rubber" made from cloth and cotton wool. Up need patience as quite a lot of layers are required to get a deep finish. Each layer takes around ten to fifteen minutes to be dry enough to apply another layer. Around 10 or more layers were applied. It's better to put on more than you think you'll ever need so that when it's finished later you need not worry that you will cut through the finish to the artwork.


I decided not to leave the biscuit plain wood and applied some shellac to that also. This way it matches the look of the rest of the guitar.

The biscuit is screwed in place then secured with a small drop of super glue. Although the bridge should transfer the vibration pretty well through the saddle. Having it screwed to the bowl provides a direct contact with it and should guarantee good transfer, as well as holding it in place.

More shellac applied to the neck. You can see the ridges from applying a lot of layers.

Here I am wet sanding the shellac back smooth after a few days being left to dry. There are other methods for applying a good finish to wood, however Hemlock is extremely porous and does take a finish very well, however it soaks stuff up like a sponge.

Time to fit those frets, bite the bullet and just go for it!

A final check of the fret slots with a hobby file before the nails going in.


Part of this home brew stuff is making your own tools. I used this off cut to make a fret pusher to get the nails in straight and true. It's simply a block of wood rounded one end for comfort and a slot cut at the other shaped with a hobby file to fit the nails.

I fitted a few to see how it was going and cut them back with a hacksaw to make sure that once glued they wouldn't move. By roughing up the nails with sandpaper and the hemlock being nice and porous, the super glue really locks these nails in place.

If anyone reading this is in any doubt, you can see here that they are real nails and have been I divi ally cut down to the width of the neck. This was quite a quick job, if quite hard work.

The frets filed back to the neck, I'm knackered! Maybe fret wire was a better idea? lol


Holes marked out for the machine heads. I did some quick maths and a paper template. After much thought a 2 x 2 arrangement seemed best and a simple headstock, nothing too fancy.

Another great cheap tool is the tapered reamer. Excellent for enlarging holes quickly and without too much fuss :-)

More sanding of the neck. There were a few scrapes from he fretwork and I wanted them totally flush with the neck.

Woodust collected from sanding makes a good filler.


Filler applied to the frets and neck. This looks awful but all will become clear after sanding.

As you can see. Any small gaps are filled and perfectly smooth after sanding :-)

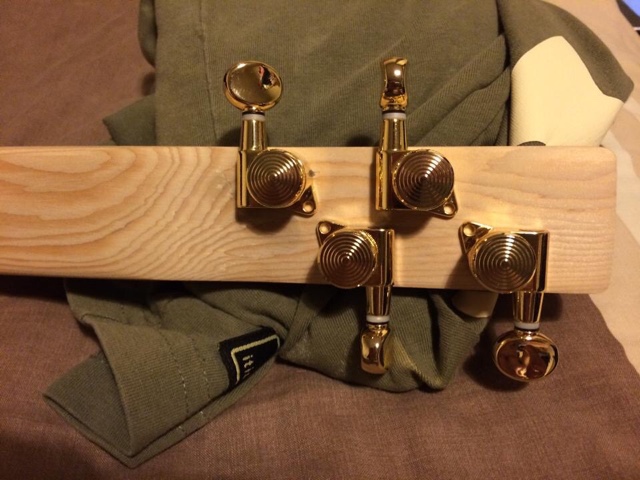
A test fitting of the machine heads.

It's essential to make sure everything fits flush and just looks right before moving on. I know I've mentioned it before, but small steps and lots of checks make the job go much smoother in the long run.

These are locking machine heads. Around £25 for a full 3x3 set giving me two spares. I really like these tuners and had bought them before so was sure they would be just the thing for this build.
Applying shellac the the length of the neck was a much simpler task. A lovely golden colour this shellac is pretty cheap. It's just normal stuff from B&Q. You can buy different colours online and even clear but I liked this colour and it was cheap buy locally. Again many layers applied. Probably 20 layers in all. Yes way over the top, but like I said, shellac goes on quickly and pretty thin, so having more than you need is a must to protect the wood and get a deep glossy finish at the end.

After a little wet sanding and polish, I applied some wax to see how it would look.

A beautiful glossy finish all over this neck and looks as good as if it had been sprayed with a cellulose lacquer. Applying a finish by hand takes as much care, but you won't need a spray area and it's a lot easier to do at home.

The fretboard needed to be levelled like any guitar neck. This was done with he spare length of hemlock and some sandpaper. This however left large flat spots on a lot of frets so I used the same small block from earlier as a fret file by super gluing some glass paper into the groove

Fret ends finished with hobby files to give a rough 30 degree angle to the frets.


This was my first attempt at the wiring before installation. I made a few errors, but they were easily fixed once I had tried the installation in the guitar. The small circuit boards a boost circuit that runs from a 9volt supply. While the three way switch gives piezo/piezo+pickup/pickup. The circuit can be switched out by pulling the knob up or left in and rolled down before plugging in. Not a true active system but much improves the sound from the piezo and lipstick pickups

The piezo pickup is made from a simple beer bottle cap and a piezo disc. It is hot glued to the inside edge of the cat bowl.

Everything fits...just lol the 9 volt battery sits quite snug without clip and wrapped in some foam it doesn't rattle against anything at all.


Bought a mandolin tailpiece online for a few pounds and drilled some small holes at the dye for the strings to pull through.

Stringing up is really easy with these locking tuners. There is a small wrap to prevent string breakage and the guitar holds tune very well indeed.


Small slots were cut into the bone saddle for the strings to sit in. The action height is pretty low and a good balance for both slide and some picking.


Build time was probably several weeks spent over a few months in spare time and weekends. Attempting a project like this takes patience and planning. Don't be afraid to try new things and see where they go. It'll be your guitar and your soul will be in it. Have fun and just have a go :D
Hi. this guitar is amazing, and I have already started making my own, with a very similar design. But could you explain in a little more detail what you did with the circuit board in an email, or just here as a comment? and how the whole thing is wired?
ReplyDeleteI don't have a problem with the wood parts, but I'm not an expert in electronics :)
Thank you
my email is skrantelars@gmail.com :)
ReplyDelete